

Note: Please know that I am not a professional. I'm an amateur photographer on a small budget. And this is what I've found to work for me.
I get a lot of questions about how I get my white backgrounds.
Some people think I have a studio, which is an amazing compliment but not at all true.
I shoot my white background photos on our deck using two sheets of white posterboard and some tape. Really, I do!
No studio required and it'll cost you less than $1.00.
Here's my typical setup:
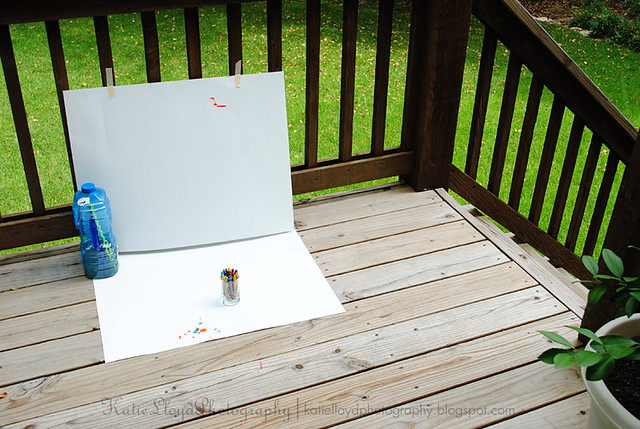
As you can see, the posterboard doesn't even need to be completely clean. I use the cheapest kind, which is about $0.40 per sheet at Walmart.
(these work well as reflectors, too!)
I like to shoot on overcast days because of the soft light and lack of shadows.
This particular day there were a lot of clouds that blocked the direct sunlight for several minutes at a time. Open shade can also work well.
(Pioneer Woman has a nice article on open shade!)
I use tape (and on this particular day a jug of bubbles) to keep the backdrop board upright.
It seems that overcast days are also windy days and sometimes the tape alone doesn't hold as well as I need it, hence the paint on my boards!
I set up next to the stairs for two reasons: 1.) It's the only space available on our deck! And 2.) I can get down low a lot easier by sitting on the steps, as opposed to laying down with my face smooshed against the deck.
Here's one of the crayon shots I got.
This was shot from above and therefore I didn't even use my backdrop board.
ISO 100 | f/5.6 | 1/125 sec | 300mm

And here's one where I shot from ground level and did use the backdrop.
ISO 100 | f/5.6 | 1/60 sec | 300mm

As you can see, it's not always perfect. I sometimes get vignetting from my lens.
(here's a good article on in-camera vignetting)
I've found that if I set my shutter speed lower than I think it needs to be, I'm more likely to get that pure white exposure of the background.
If your background is looking a bit gray, you can usually fix it by adjust the exposure using your editing software. Picnik makes this incredibly easy...and free!
Hopefully I've answered a lot of questions with this, but if you still have a question please feel free to ask in the comments or email me!
I get a lot of questions about how I get my white backgrounds.
Some people think I have a studio, which is an amazing compliment but not at all true.
I shoot my white background photos on our deck using two sheets of white posterboard and some tape. Really, I do!
No studio required and it'll cost you less than $1.00.
Here's my typical setup:
As you can see, the posterboard doesn't even need to be completely clean. I use the cheapest kind, which is about $0.40 per sheet at Walmart.
(these work well as reflectors, too!)
I like to shoot on overcast days because of the soft light and lack of shadows.
This particular day there were a lot of clouds that blocked the direct sunlight for several minutes at a time. Open shade can also work well.
(Pioneer Woman has a nice article on open shade!)
I use tape (and on this particular day a jug of bubbles) to keep the backdrop board upright.
It seems that overcast days are also windy days and sometimes the tape alone doesn't hold as well as I need it, hence the paint on my boards!
I set up next to the stairs for two reasons: 1.) It's the only space available on our deck! And 2.) I can get down low a lot easier by sitting on the steps, as opposed to laying down with my face smooshed against the deck.
Here's one of the crayon shots I got.
This was shot from above and therefore I didn't even use my backdrop board.
ISO 100 | f/5.6 | 1/125 sec | 300mm
And here's one where I shot from ground level and did use the backdrop.
ISO 100 | f/5.6 | 1/60 sec | 300mm
As you can see, it's not always perfect. I sometimes get vignetting from my lens.
(here's a good article on in-camera vignetting)
I've found that if I set my shutter speed lower than I think it needs to be, I'm more likely to get that pure white exposure of the background.
If your background is looking a bit gray, you can usually fix it by adjust the exposure using your editing software. Picnik makes this incredibly easy...and free!
Hopefully I've answered a lot of questions with this, but if you still have a question please feel free to ask in the comments or email me!
Great tutorial...thanks for the pull back!
ReplyDeletewow fantastic pictures and great tutorial! Thanks for dropping by my blog :)
ReplyDeleteThank you so much for posting this!! I have been wondering how you take those wonderful shots!! Can't wait to try it!
ReplyDeletewhat a fantastic tutorial, that was great! I use black velvet but have never thought to use white card so I will now try it, thankyou!
ReplyDeleteGreat tips! I love reading about how other people get good photo effects.
ReplyDeleteI've used all sorts of things for a white background: computer paper, the back of a large poster (printed on foam board) and, most recently - a white shower curtain.
MCP has an action that I absolutely can't live without. It's part of their "bag of tricks" and it removes color cast and wrinkles and other imperfections from your backgrounds turning them pure white (or pure black). I'm using it more and more lately. I used it for this week's photo of Gwen's "treasure". ;)
Donna
Our Blog: Double Happiness!
Great job explaining how you do it... thanks for sharing
ReplyDeleteGreat tutorial and great pictures!
ReplyDeleteI am all about this!! Thank you so much for this lil tutorial!
ReplyDeletethat's great! Thanks for the tutorial on it. I hate indoor lighting, it never works well with me (I know, that's my problem, but I can't quite figure it out so I am always outside)
ReplyDeleteYou have got to be kidding me?!?!?!? You totally rock it girl!!!! I am going to have to try white and maybe some black too! Thanks for this awesome post!
ReplyDeleteI use my deck as a "studio" too!
ReplyDeleteThank you for sharing.