I tell ya...Darcy of My 3 Boybarians is wowing me with her 31 Days to a Better Photo Series!!!
Totally WOWing me!
Totally WOWing me!
Lightbulbs keep going off in my head.
And I don't mean those cheap incandescent lightbulbs, either.
These are 'expensive CFLs that will last me for the next 80 years' kind of lightbulbs!
I had no idea my camera would make shooting on manual so easy for me.
You know when you're on manual and there's that little meter thingy on the display, the one with all the hash marks and has a + on one end, - on the other, and 0 in the middle?!
This is what she explains...definitely give Darcy a visit!
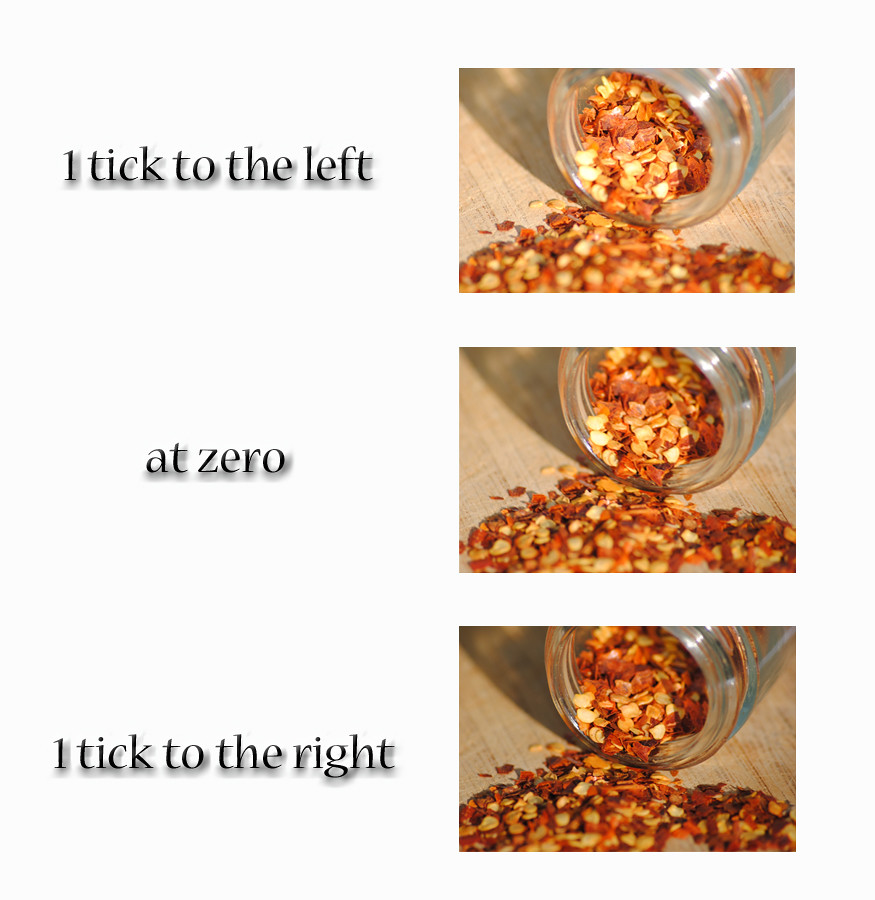
Since I am a very visual learner, I thought it was a good idea to test this out with my own camera.
I decided I wanted to know what the difference is of being one tick off from 0.
I use a Nikon and on my camera's meter the left side measures the amount of underexposure and the right measures the amount of overexposure.
(I think this is opposite on Canons)
I decided I wanted to know what the difference is of being one tick off from 0.
I use a Nikon and on my camera's meter the left side measures the amount of underexposure and the right measures the amount of overexposure.
(I think this is opposite on Canons)


Aww. I didn't know that you didn't know that. It does make it so much easier. I find on my D3000 that I like my pictures a little brighter and sometimes use the one click to the left. Great picture by the way!
ReplyDeleteI was just about to say...that's the opposite of canon. I usually shoot one to the right. :)
ReplyDeleteIsn't it amazing how something so seemingly small, can make such a difference? Also, if for any reason you want overexposure on the left, and underexposure on the right, there is usually a setting in the custom menu to change that.
ReplyDeleteGlad you are liking the 31 Days series!
still learning and trying to be in mannual more.
ReplyDeleteI get frustrated and go switching any dail before I just stop and think. This helps me. I have gotten the correct lighting on a few sky shots I took. Learning about the ISO and FSTOPS too. I need to check out her blog.
Isn't that part of a Duran Duran song - a tick to the left, a tick to the right - Rio? Thanks for the demonstration!
ReplyDeleteThanks for the link and info!! Will go check it out now!
ReplyDeleteI like the one tick to the left personally. It is the perfect brightness!! I like your prop you used for this too.
ReplyDeleteJust thought I'd share this. The default setting for all Nikons is + on the left and - on the right, but you can change this. I have a D90, not sure if it in the same place for all nikons, but I'm sure you can find a site where Ken can help you out. Ken explains it well and all about custom settings. Go to site I share and find f7 Reverse Indicators to change the exposure meters. If you want to learn all about the Custom Settings go to the bottom of the website to the menu. http://www.kenrockwell.com/nikon/d90/users-guide/menus-custom-ctls.
ReplyDelete